|
Original
configuration: (Mac Mini 1,1 - A1176)
1.5GHz Intel Core
Solo
512MB RAM
60GB 5400RPM HDD
Mac OS X 10.4 Tiger |
Current
Configuration: (Mac Mini 2,1)
2.16GHz Intel
Core2Duo T7400
4GB RAM
250GB SSD
Mac OS X 10.6 Snow Leopard |
Introducing the mac
mini '98, an affordable desktop Macintosh for
the home or office.
Folder of high res images>>>
Music used in youtube video
- Money for
Nothing - low and slow
(I have a floppy disk
of midi files from the 90's, I imported this song into
GarageBand, removed tracks, changed tempo and
instruments, and added my own drums track. I will try to
track down and credit the original composer)
This mac mini was
purchased with the belief that it was an original G4 mac
mini, but it was being sold as-is/for parts or not
working. When it arrived, I immediately noticed the
ports on the back, this was an intel mac mini. Being
that you can't return as-is purchases on eBay, I decided
to fix it rather than being upset. I added RAM and an
SSD and it just booted up. There was nothing wrong with
it that I could tell.
After I got it working, I
wanted to install Snow Leopard onto it. Snow Leopard
requires 2GB of RAM and this only had 512MB at the time.
I bought 4GB of RAM to put in it, as I read that was the
maximum. However, 2GB is the current maximum. It is
possible to use 4GB, but it needs a firmware upgrade.
That's where dosdude1 comes in. He created a firmware
patcher to change the 1,1 firmware to the 2,1 firmware.
This allows the 4GB maximum RAM but also requires a dual
core processor. I purchased the T7400 2.16GHz Core2Duo,
plopped it in, installed Snow Leopard with 2GB of RAM,
ran the firmware updater, and then added the other 2GB
of RAM in. Now we have a fully upgraded intel mac mini.
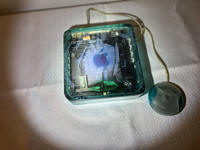
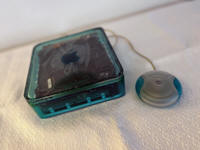
But I wasn't done yet. I
don't know what gave me the idea, but I decided to try
my hand at casting resin. I made a silicone mold (for
the first time ever) and mixed up some 2 part epoxy
resin, with a mixture of blue and green dye trying to
replicate the Bondi blue color of the original imac.
Needless to say I have some learning to do. Resin leaked
out of the mold at some point, so the shell was only
half the height it needed to be. So after a few days, I
mixed up more resin, this time I got the color wrong as
well, so now with the second pour, there is an obvious
line in the case. Oh well. Once that was all dry, I
sanded down the case to try to remove imperfections that
my mold left in the resin. Long story short, This took
several pours and changing strategy to get this end
result. I am happy with how this turned out, but I know
I can do better in another attempt. I had many mistakes
in this project but I realized them now and can produce
a much better result in the next attempt. So it's not
perfect but I think it looks pretty cool.
During the molding and
casting process, I, an amateur, made many mistakes. I
hope to revisit this and make a much better project in
the future. When I
made the mold I used silicone to get the fine details on
the inside of the aluminum case, that worked great, but
the outside of the case mold, I made out of cardboard
and box tape. This is what caused the resin to leak from
the mold. It also left cardboard and tape embedded in
the outside of the case, which I had to dig out and fill
back in with more resin. The outside of the shell also
wound up being too thick, so I had to sand and sand and
sand to get the shape and thickness needed to make it
look normal. Then, for the top of the case, I originally
made a mold of the white part. I casted that but it was
too thin and brittle. So my next idea was to tape off
the green part, turn it upside down, and fill it with a
layer of resin. This worked and also didnt work. The
tape wasn't completely smooth, and left a wavy sticky
mess on the top of the case. I had to sand that flat now
and add even more resin.
Once it was flat and smooth,
I added the apple logo. Which, if you werent aware of
this cool feature, the mac mini has an apple logo mold
right on the bottom of it, in the rubber foot :). I put
some UV resin in the apple shape, cured it, and then
added it to the rest of the resin case. That looked fine
but everything was still rough. I decided to paint the
entire thing with a thin layer of resin to smooth
everything out and get rid of the scratches from
sanding. You can see evidence of where the tape was in
the lid, the weird spot that reacts to light on top were
formerly dents from the tape that got filled in with
resin. When - yes
when - I try this again, I will make a full silicone
mold of the entire case. that way I can pour it one time
(praying for no leaks) and it would be done the first
time correctly. I think I am going to try the tangerine
color next. Thanks
for reading this ramble. - Baylin |
